In this scenario, we'll outline how to manage an audit process for ICT suppliers considered critical or important. We begin with an automated questionnaire to gather essential information from the suppliers, once the suppliers complete the questionnaire, the Procurement Responsible reviews and approves the responses. After Procurement's approval, the Risk Manager conducts a final review and approval. Approved suppliers proceed to onboarding; rejected ones are deleted from the system.
Step 1. Establish the ICT Supplier Audit Trigger and create the supplier in the platform.
- Set a criteria that will be the trigger to identify critical or important ICT Suppliers that need to perform audit:
- Login to the system with your credentials at: https://app.formalize.com/auth/login
- Go to 'Settings'-> 'Resources' folder, specifically 'Suppliers'
- Create an optional field that will be visible to all existing and new suppliers, where specific criteria can be defined. This allows for the identification of suppliers categorised as "important" or "critical," who must undergo the audit process.
2. Create the Supplier on the platform:
- Go to the 'Suppliers' section inside of 'Resources'
- Click in 'Options' and press '+ Add Supplier.'

- Remember to classify as "critical" or "important" if that's the case.
- Make sure to provide accurate details for both the supplier and their contact person. This ensures that automated questionnaire requests will be correctly directed to the responsible individual at the supplier's end.
- Save the information in the bottom left corner.


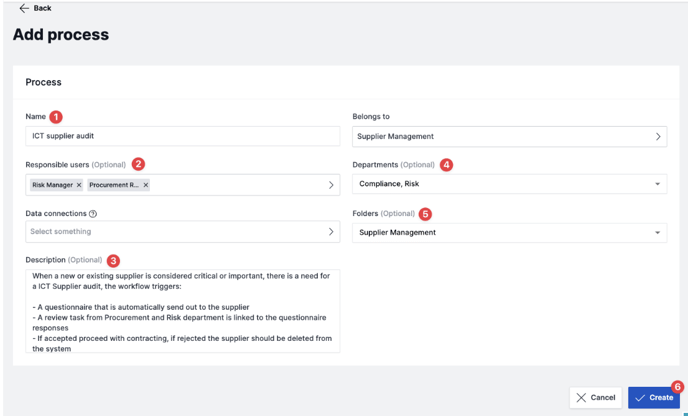
Step 2. Create a dedicated sub-process for auditing critical/ important ICT suppliers within the established "Supplier Management" process.
- Go to 'Resources' -> 'Processes' at the left hand side.
- Press the main process, which in this case would be 'Supplier Management'
- Press '+ Add subprocess' button.
Step 3. Fill all the fields of the subprocess.
- Provide a descriptive name for the subprocess.
- Identify and assign the responsible user/s for overseeing and managing this process.
- Write a detailed description explaining the purpose of the process and outline the workflow steps involved.
- List all departments or teams involved in the process.
- Link the process to a specific folder or category for better organization and easy access. In this example it's linked to the 'Supplier Management' folder, by accessing to this folder, all processes related to supplier obligations are readily visible.
- Press 'Create' in the bottom right
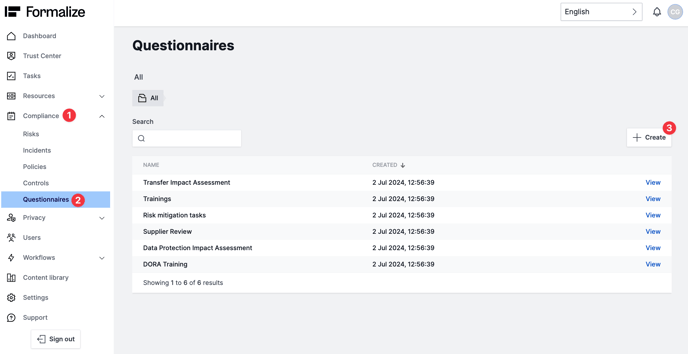
Step 4. Create a 'Questionnaire' for the process you just designed.
- Choose the 'Compliance' -> 'Questionnaires' at the left hand side.
- Press the" + Create" button
Step 5. Create your own fully customisable questionnaire.
- Divide the questionnaire into different steps according to main topics.
- Write clear and concise questions for each topic.
- You can also set conditions within the questionnaire, making subsequent questions appear based on the response to the first question.
Step 6. Create your approval flow to review your task
- Press 'Settings' in the left hand side
- Select 'Approval Flows'
- Press '+ Create'
- Name your approval flow and press 'Create'

Step 7. Define an approval flow and associate it to tasks.
- In this case, whenever a supplier fills out a questionnaire, a task will be created for the Procurement Responsible to review and approve the responses. After this approval, the task will pass to the Risk Manager, who will conduct a final review and conclude the task by either accepting or rejecting the supplier's responses.
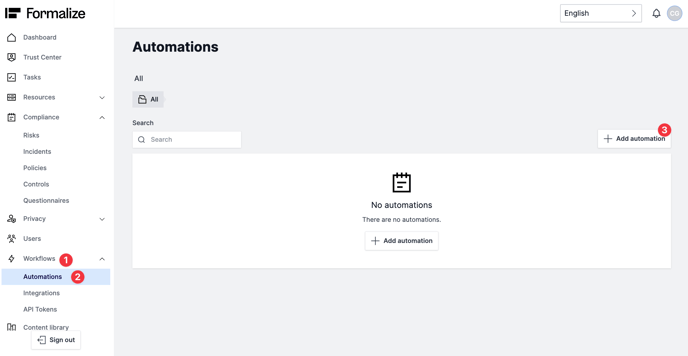
Step 8. Press 'Workflows' -> 'Automations' at the left hand side and select 'Add automation'.
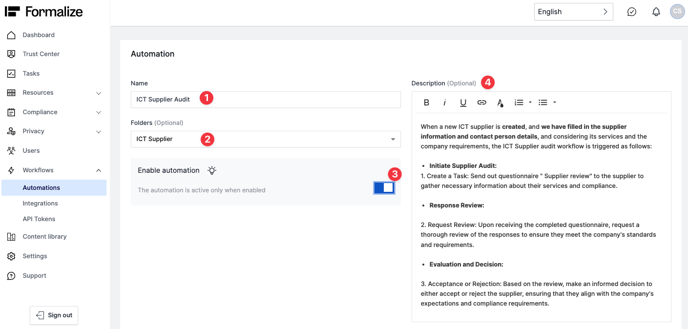
Step 9. Fill all the fields of the automation.
- Provide a descriptive name for the automation.
- Link the automation to a specific folder , in this example it's linked to the 'ICT Supplier' folder.
- Make sure to enable the automation
- Use the description to describe your process
Step 10. Define the automation trigger based on a specific condition.
- In this example, the automation should trigger every time an existing or new ICT supplier is marked as "critical" or "important".
Step 11. Create an action to send a communication to a critical/important supplier to fill the 'Supplier Review' questionnaire.
- This should follow the approval flow you defined for tasks, allowing us to accept or reject the supplier responses.
Now that you have defined the automation and previously identified your "critical/important" suppliers, from the supplier's perspective, this are the next steps:Step 14. Tracking Questionnaire Status.
1. The supplier will receive an email notification with instructions to fill out the questionnaire. In this email, they should press the "Click here to login" link to access the questionnaire.
2. The supplier needs to authenticate the email, ensuring that it matches the email address listed in the supplier's contact details.
3. The supplier now needs to confirm their email by entering the PIN they just received in the email.
4. The supplier can fill out the form and track their progress in the status section located in the left corner. Once all the required questions are completed, they can 'Submit' it using the button in the bottom left corner. If only some fields are filled, it is possible to save the form as a draft and complete it later.


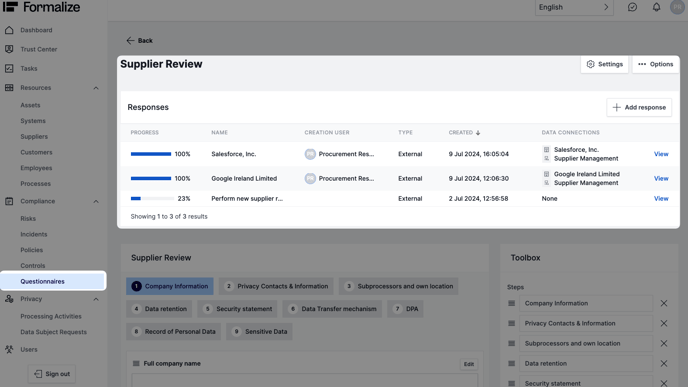
- From the Procurement Responsible and the Risk Manager’s perspective, they can track the current status of the questionnaires by pressing "Questionnaires" in the left-hand menu and selecting the questionnaire they want to follow-up with, which in this case is the "Supplier Review" questionnaire.
Step 15. Once the questionnaires have been completed, Procurement Responsible Review Process:
- Initiate Approval flow: Locate and open the specific review task and submitted to review
- Review Responses: Check the supplier's questionnaire responses.the Procurement responsible person should proceed to access the tasks and complete their part. This involves performing the first approval of the review task located within the Supplier Review folder
Step 16. Procurement Responsible Approval Process.
- Return to Task: Go back to the approval task view.
- Make a Decision: Decide whether to approve or reject based on the review. Add comments if necessary and submit your decision. Since the procurement responsible has approved it, the task is now pending final approval from the risk manager.
Step 17. Risk manager approval.
- Login and Access Approval Requests: Login to the system and navigate to 'Approval Requests' in the top right corner.
- Find the Task and Make your final decision: Repeat that exact same process as in the step 14 and again decide whether to accept or reject. In this case, the Risk Manager rejected the supplier's responses due to non-compliance with company security requirements.
Step 18. As established in our process, when supplier responses are rejected, proceed with deleting the supplier from the system.
by Carolina Gonçalves, Product Communication Specialist
We hope this article was helpful!If you need additional support, please feel free to schedule a meeting with Giulia, from our Customer Success team, here.
For a platform overview and commercial details, you can book a meeting with Kristoffer, from our Sales team, here.
Otherwise you are of course always welcome to reach out by email contact@formalize.com .
