Overview
Fields are a consistent part of every module in the platform. By default, each module includes some standard fields when creating elements. On top of that, most modules also allow you to create custom fields tailored to your needs.
Custom fields let you personalize the kind of information you collect, ensuring each element captures the data that matters most to your organization.
Field Types
- Text & large text fields: use for open responses.
- Number fields: accept only numeric input and can include Regex for custom patterns.
- Date fields: capture date values in a standardized format as well as time.
- Single select & multiple select fields: use a single select field when users should choose only one option, and a multiple select field when they can choose several options from a list. Each option can include a report value, which is useful for data reporting, as well as a numeric value for calculated fields(see more on this below). You can also assign a color to each option.
- Checkboxes: allow users to check a predefined option when you want make sure for something to be confirmed that it was taken into consideration
- File upload: let users upload files directly to the element, can be specially relevant in Contracts.
- Link field: store and display clickable URLs.
- Text info field: use this when you want to display information without requiring input. You can add a title and a description, which will be visible when creating or editing the element where the custom field was added.
- Conditional logic: make fields appear based on responses to previous fields.
- Repeatable groups: allow users to add multiple entries for a set of fields (e.g. list multiple servers of a supplier).
- Sections: organize fields into groups for better structure and clarity. You can create a section and drag existing fields into it, move them out, or create new fields directly within the section.
- Variable Text
-
Single type: Use formulas that combine static text and values from other fields.
-
Mapped type: Link to select fields and each choice triggers a different predefined output.
-
-
Numeric Calculation Fields
-
Use formulas to calculate values using inputs from other fields (this is why it's relevant to attribute a numeric value in the single select and multi select fields to then use it as inputs).
-
Supports functions like min, max, sum and average.
-
You can define score ranges with labels (e.g., 0–3 = Low, 4–7 = Medium).
-
Results from one calculation can be inputs for other numeric calculation fields.
-
Common settings for all fields
- Main Settings
-
Required: Decide if the field must be filled out before submission (mandatory).
-
- Additional Settings
-
Placeholder: Display hint text inside the field to guide users before they enter any information.
-
Input Format Checker: Define specific input formats (e.g. phone number: 123-456-789).
-
Error Message: Show a custom message if the input doesn’t match the required format.
-
Description: Help users fill out the field with extra guidance—choose to display it as a tooltip or side panel.
-
Specific for Single select and Multiple select
- Smart Fill Settings: Formalize Smart Fill can automatically populate fields based on uploaded files or contextual cues in your document. Select a file source and add any special instructions. The AI already understands the field’s name, type, and possible answers
- Select File Context: Select the file source that the AI will reference to answer the question.
- Additional instructions to Smart Fill: Include any specific instructions here to ensure the generated suggestion meets your requirements.
- Conditional options:
- Add option group: Use groups when different sets of options need to be shown depending on different conditions
Specific for Single select, Multiple select and Numeric calculations
- Configure extra properties:
- Enable report value: This option allows you to assign a hidden value to each answer for use in reports. When enabled, any reports generated from Data Reports will use the hidden value instead of the value visible to the user.
Example: You have a question about whether a supplier has an ISO certification:
-
Answer: Yes → Hidden report value: Low risk
-
Answer: No → Hidden report value: High risk
-
- Enable numeric value: This option allows you to assign a numeric value to each answer, which can then be used in numeric calculations.
Example: You have a question about how high the risk level of a supplier is with three options:
- Low → Numeric value: 1
- Medium → Numeric value: 2
- High → Numeric value: 3
- Enable color: It allows you to assign a color to each of the answers.
- Enable description: Give a description for each field to assist users in choosing the right one.
- Enable report value: This option allows you to assign a hidden value to each answer for use in reports. When enabled, any reports generated from Data Reports will use the hidden value instead of the value visible to the user.
How to move fields
You can rearrange your custom fields or move them inside conditional sections.
To do this, click the four parallel lines in the top-left corner of the custom field you want to move, then drag it to the desired position.
Where are custom fields available?
Custom fields can be configured in the Settings area for:
-
Company Information (General settings > Company information)
-
Company Entities
-
Tasks and task completion flow
-
Compliance elements (Frameworks, Policies, Risks and Incidents)
-
Resources elements
-
Data Privacy elements
They’re also used outside of Settings in:
- Questionnaires: Whether you’re creating a new questionnaire or editing one of our existing templates, you can configure fields.
- Dashboards: You can use fields to filter and customize widgets, so they display exactly the data you need based on specific field values.
- Data Reports: When setting up data reports, you can filter the results based on field values.
- Automations: Fields can define conditions for triggers and actions within automation workflows.
Setting up fields examples
Conditional Logic
Use case: When sending out a questionnaire—such as an audit feedback form to support continuous improvement—you may want to know whether the audit objectives, scope, and criteria were clearly communicated to all relevant stakeholders.
Depending on their response, you can take different actions:
-
If “Yes” → ask follow-up questions, for example, to provide a description.
-
If “No” → automatically create a task to address this gap.
1. Navigate to your Questionnaires
Go to the Workflows section and click on the Questionnaires tab.
Choose to + Create a questionnaire from scratch or from a template.
Click the + button to start adding fields.
2. Create a Single Select Field
💡 Tip: Expand the video to full screen for a clearer view of the steps.
Add a Single select field.
Set the title for your question.
By default, three options will appear—you can add more options or remove.

3. Set a Condition
- Click the + again
- Select Condition and choose which field to base the condition on
Define the condition:
Is filled– triggers the condition as long as any option is selected.
Is not filled – triggers the condition only if no option has been selected.
Has selected any of– triggers the condition only when the chosen answer or answers matches a specific option.
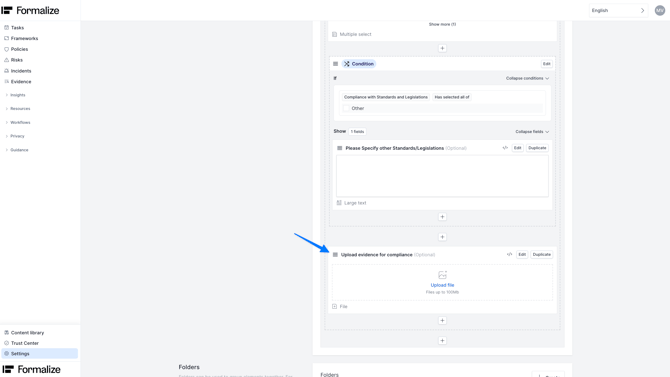
Add Fields inside the condition
After setting the condition, add one or more fields inside it, these fields will only appear when the condition is met.
- For more context, in the video below, we’ll walk you through how to create two different conditions based on the options from a single select question. For one option, we’ll add a text info field, and for another, we’ll show how to create an additional follow-up field.
💡See the video below for a quick walkthrough of how it looks in action when answering the questionnaire.
Numeric calculated fields
Use case: When creating assets, you might want to track their availability, confidentiality, and integrity. Based on those values, you can automatically calculate the sensitivity of each asset using a numeric formula.
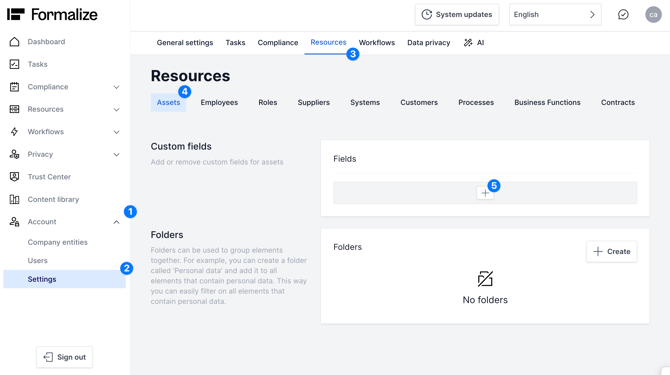
1. Navigate to your asset settings
Go to the Account section and click on the Settings tab.
Choose the Resources tab and the Assets folder
Click + to start adding fields.
2. Create Select fields with numeric values
Add a Single Select field and define your options (e.g., Very high, High, Moderate, Low)
Go into the Advanced Settings of each option and assign a numeric value to each (e.g., Very high=4 ,High = 3, Medium = 2, Low = 1)
3. Create the numeric calculated field
After creating your single select fields, in this example for Availability, Integrity, and Confidentiality.
Add a Numeric Calculation field, use the average function to calculate the asset’s sensitivity based on the three inputs you have just created and set your score ranges.
Note that you can also include numbers and other arithmetic expressions in your formula.
💡See the video below for a quick walkthrough of how it looks in action when you are creating an asset.
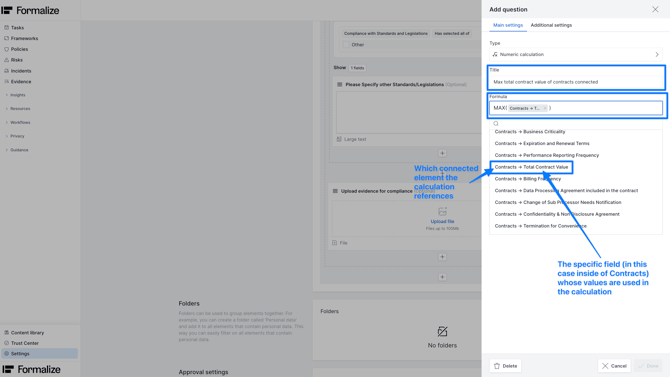
You can also create numeric calculations across connected elements:
Repeatable Groups
Use case: When sending out a supplier assessment questionnaire—especially to critical or important suppliers—it’s useful to track their supply chain. You might want to ask for details about their sub-suppliers. Since one supplier can have multiple sub-suppliers, using a repeatable group lets them add as many entries as they need.
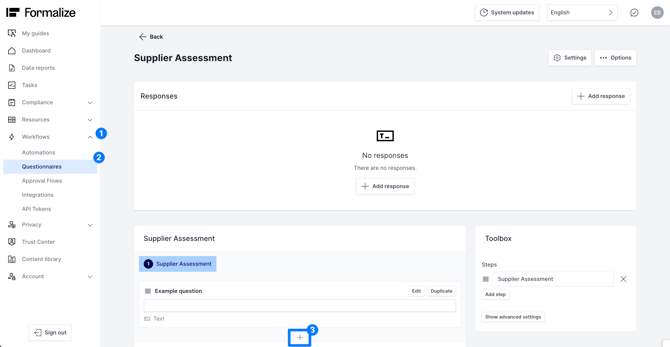
1. Navigate to your Questionnaires
Go to the Workflows section and click on the Questionnaires tab.
Choose to + Create to a questionnaire from scratch or from a template.
Click + to start adding fields.
2. Create a Repeatable group
Add a repeatable group and include the fields/questions you want repeated each time a new entry is added. In this case, we want to ask for the name and organization number of each sub-supplier.
💡See the video below for a quick walkthrough of how it looks in action when answering the questionnaire.
by María Amparo Soriano Varela, Customer Enablement Manager
We hope this article was helpful and that you can now create Custom fields with confidence!
If you need additional support, you are welcome to reach out with any questions by email, at support@formalize.com.