About the DORA Register of Information (ROI):
Core Concept: The ROI is a fundamental element of the Digital Operational Resilience Act (DORA).
Purpose: It is a mandatory, structured record that financial entities must maintain to demonstrate compliance and operational resilience.
Structure: It is composed of 15 distinct reports that map and connect your organization's ICT supply chain to its associated ICT Services, Contracts, Sub-contracts, and both critical and non-critical Business Functions.
How to map the relevant Resources
1. How to map a Supplier
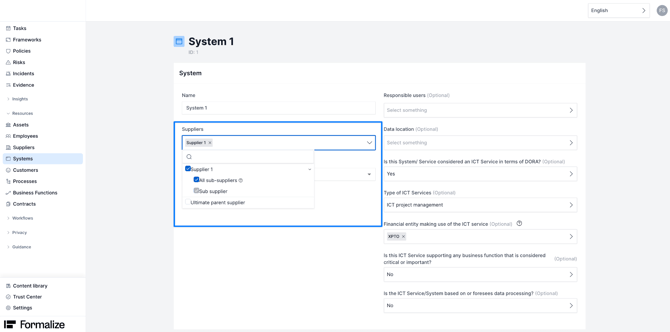
There are four kinds of suppliers that need to be mapped, the direct supplier (level 1), the subsupplier (level 2), the ultimate parent and the intra-group supplier.
- Direct Supplier
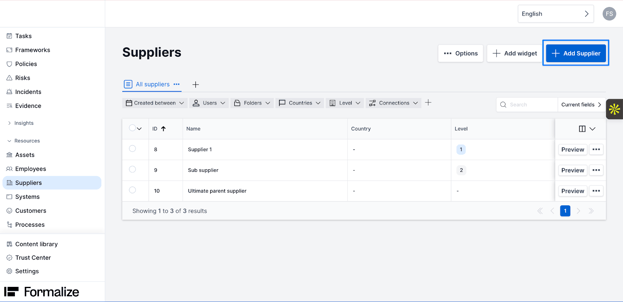
To add a new supplier in Formalize, navigate to the Resources section located in the right-side menu.
Within Resources, select Suppliers.
Click on Add Supplier and complete the form with the required supplier-specific information.
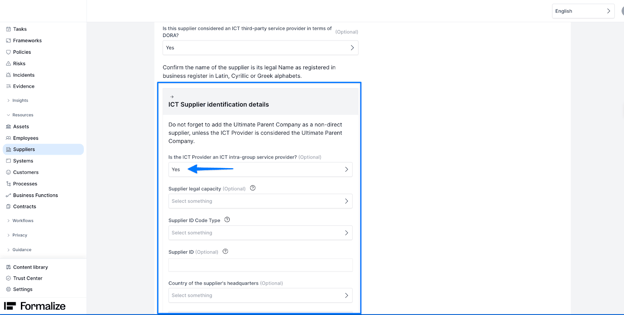
To trigger the form you will have to select “yes” on the question “Is this supplier considered an ICT third-party service provider in terms of DORA?”

All the following fields are mandatory because they populate specific columns in the ROI and must be completed.
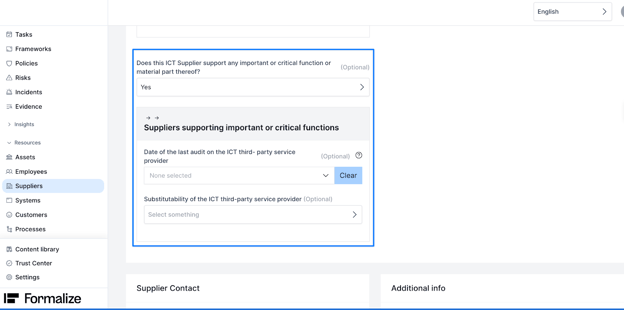
If the supplier you are mapping supports a critical function, two additional fields will appear. You do not need to fill in the "Date of the last audit" field if you don’t have the information available; it will be automatically populated with the date 9999-12-31 upon exporting the report.
- Sub-Supplier
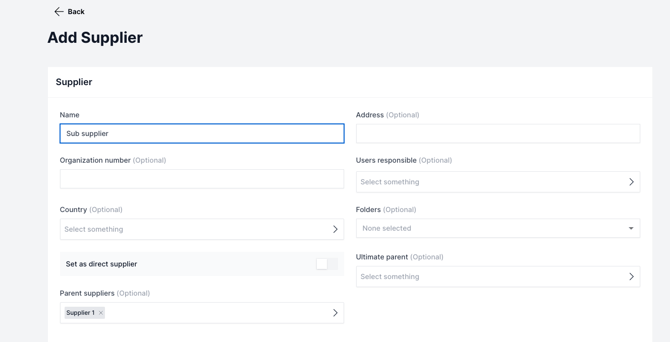
You can create a sub-supplier directly from the associated direct supplier's record, by clicking on the "Create sub-supplier" button.

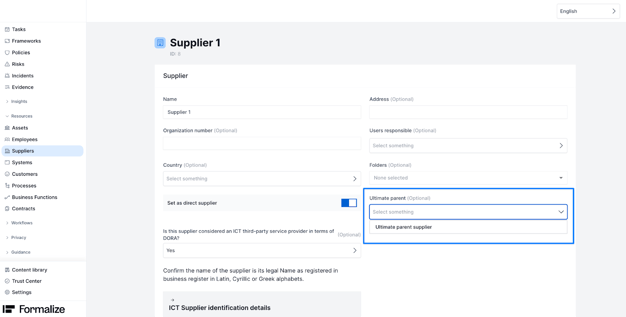
- Ultimate Parent
The ultimate parent is defined as the "mother company" of your direct supplier (level 1). Typically, for companies within a group structure, the Holding entity will serve as the ultimate parent for all other group entities. While not every company has an ultimate parent, those that do must have it mapped.
To create it, click "Add Supplier" and complete the "Name" field along with the other required fields. Remember to deselect the "Direct supplier" box.

To proceed with the ultimate parent information, you must again answer “yes” to the question: “Is this supplier considered an ICT third-party service provider in terms of DORA?”
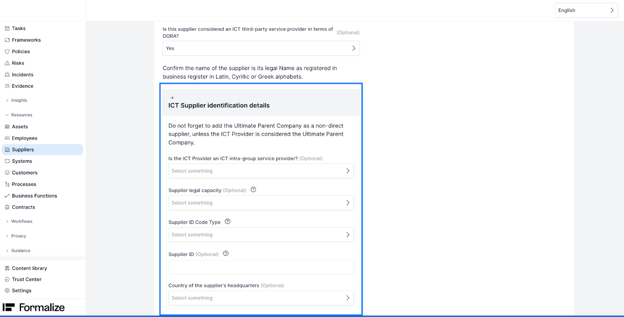
After this, you only need to complete the “ICT Supplier identification details” section. When doing so, ensure you select LEI as the “Supplier ID Code Type,” as this is the only accepted ID for the ultimate parent.
After you’ve filled out the information, you have to return to your direct supplier and connect it to the ultimate parent.
- Intra-group supplier
An intra-group supplier is a company within a corporate group that provides services to other entities belonging to the same group. Often, the Holding company functions as a supplier for some of the other entities within the group.
Intra-group suppliers should be created in the same manner as other direct suppliers. The only distinction is that you must indicate the supplier is an intra-group supplier within the "ICT Supplier identification details" section.
2. How to map a Contract
In order to create a contract, you need to click on “Add contract”

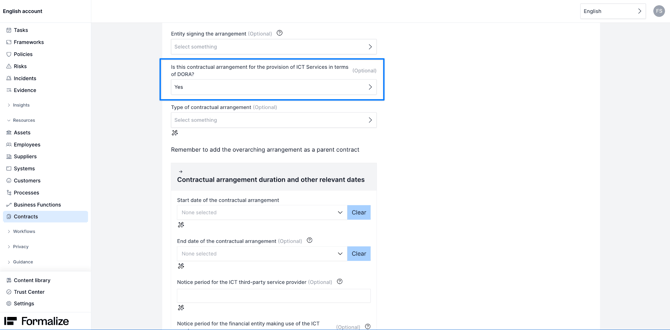
To trigger the form you will have to select “yes” on the question “Is this contractual arrangement for the provision of ICT Services in terms of DORA?
Keep in mind that all the following fields are mandatory, so you are required to fill in all of them.
As a second step, once all contracts are created you can establish the necessary relationships:
- Add connections to sub-contracts where applicable.
This ensures that the full contract structure is visible and traceable within the platform.

In Formalize, the following contract type connections are mandatory:
- Parent Contracts: Must be designated as an "overarching/master agreement."
- They must always have "subsequent contracts" connected.
- Sub-contracts: Must be designated as an "associated or subsequent agreement."
- They must always be connected to an overarching contract using the "Parent contract" connection.
3. How to map a System/ICT Service
In order to create a system, you need to click on add “Add system”
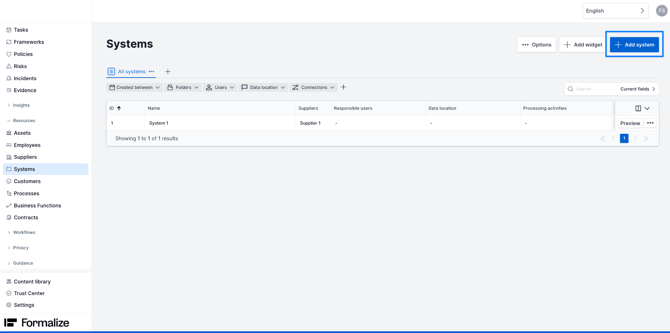
You will have to fill in a form just like you did for the previous resources, with specific information about that system/ICT Service.
To trigger the form you will have to select “yes” on the question “Is this System/ Service considered an ICT Service in terms of DORA?
Keep in mind that all the following fields are mandatory, so you are required to fill in all of them.
4. How to map a Business Function
In order to create a function, you need to click on add “Add business function”.

To trigger the form you will have to select “yes” on the next questions “Is this function supported by an ICT service?”
Keep in mind that all the following fields are mandatory, so you are required to fill in all of them.
Connections between the Resources
In order to make sure that all the reports and all the columns are filled out in the ROI, we need to connect the resources in Formalize.
After all the data is correct, and all the resources imported we will need to connect them in the following order:
- Systems / ICT services to the respective Suppliers
- Contracts to the respective Systems / ICT services and Suppliers
- Business Functions to the respective Contracts, Systems / ICT services and Suppliers
By following this order, we make sure that nothing is left out. Be aware that there is a need to be coherent with the connections and the data.
For example, if a System is supporting a business function, the contracts and supplier connected previously to that system, have to be also connected to the business function.
- Connection between Systems and Suppliers
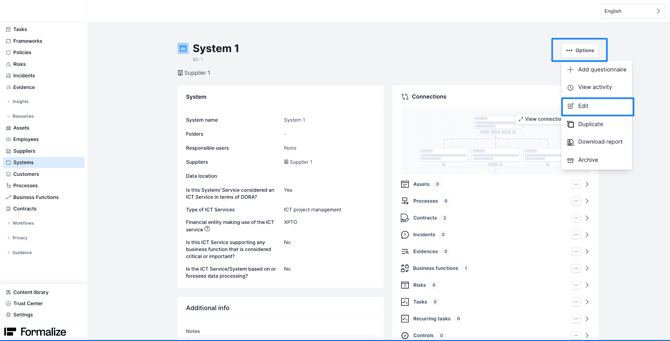
To connect a System with a Supplier, navigate to the Systems section. Choose the desired System, then click the "Options" button, followed by "Edit". In the "Suppliers" field, select the appropriate supplier chain for that System.
- Connection between Contracts/Sub-Contracts, Systems and Suppliers
To connect a System and a Supplier to a contract or sub-contract, first select the desired contract or sub-contract. In the bottom right-hand panel, locate the available connections. Select the connection labeled "System" and “Supplier” click the three-dot menu, and then choose the specific System and Supplier you want to connect.

NOTE: You only connect Level 1 suppliers to main contracts and sub-contracts, sub-suppliers don't connect to any of the other resources.
- Connection between Business Functions, Contracts/Sub-contracts, Systems and Suppliers
When selecting the Business Function you want to connect, on the right side, you will be able to see the connections available. You will need to select the ones that are called “Systems”, “Contracts” and “Suppliers”, click on the 3 dotted button and select the relevant items you wish to connect.
Once again, you only connect main Business Functions to level 1 Suppliers.

Dashboard - DORA ROI Data Checks
To access the "DORA ROI Data Checks" Dashboards, navigate to the "Insights" section on the left-side menu of the platform and select "Statistics."
This dashboard performs data checks that will help you be sure you filled out all the needed data for each resource and that all the connections are done correctly.
The goal is that the Dashboard is all green and 0 (zeros).
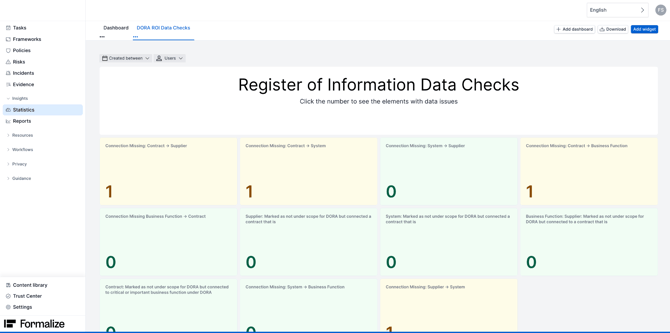
If you see one widget that is not 0, by clicking on top of it, it will show you exactly where there is missing data or connections.


You will then be able to fill in what is missing, or correct what is wrong.
Data Reports
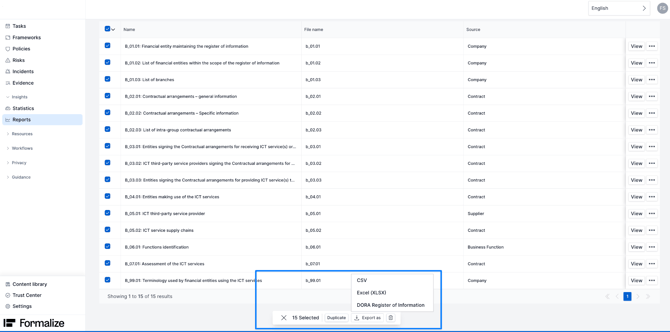
In order to export your Register of Information in the correct format, you will need to go to “Reports”.
There you can find a folder called “DORA - Register of Information”, inside of that folder you are able to see the 15 reports that form the Register of Information. In order to export them, you need to click on the top box, which will select all the reports at once.


At the bottom, you will be able to see an option “Export as”, after clicking on it, format options come up: CSV, Excel (XLSX) and DORA Register of Information.
The one in the EU Standard format is the “DORA Register of Information”, select that one.
A new window will appear, you need to fill out with the relevant information about your entity and then, click “Export”. A ZIP. file will be sent to your email address, that is your report.
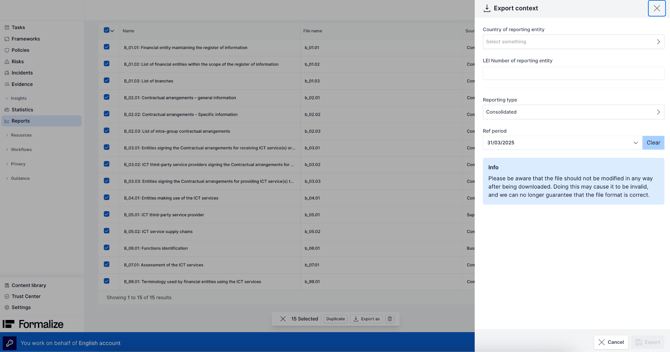
NOTE: Don’t open the ZIP file, as it damages the structure of the report and compromises the report.
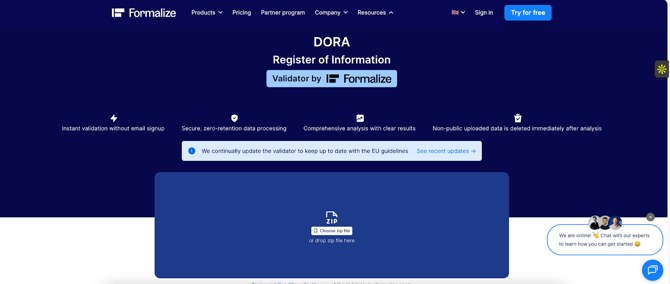
Formalize Validator
Formalize, provides a ROI Validator online , through the following link: https://formalize.com/en/roi-validator
The Validator allows for in-depth data checks on your ROI by uploading the ZIP file.
Any errors identified by the Validator must be corrected within the platform itself. Crucially, do not attempt to correct these errors directly in the generated report.
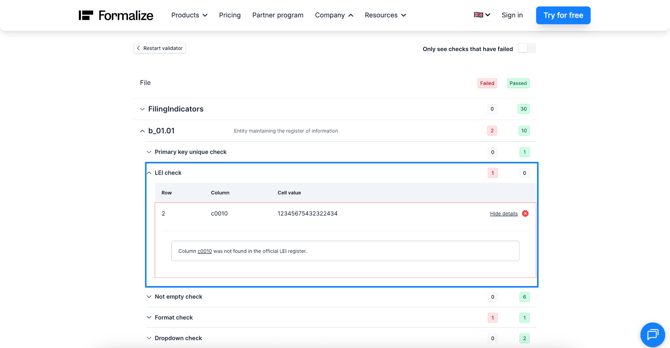
The Validator will perform several checks per report. You will be able to extend the checks per report in order to see where exactly the errors are.
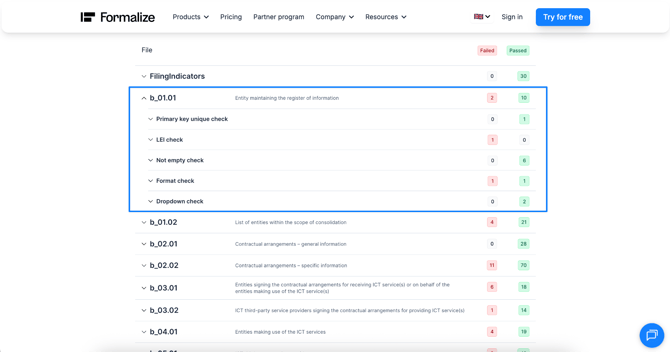
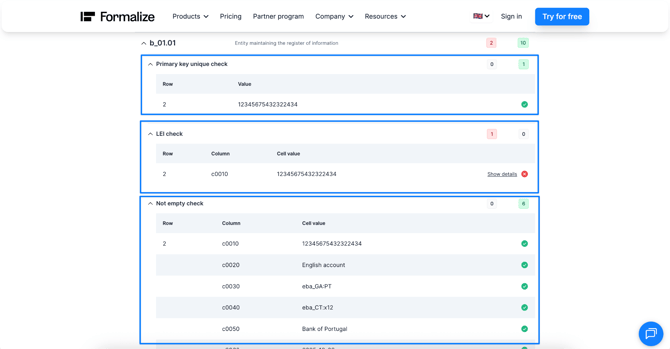
A more detailed inspection of the checks will identify the errors within the reports, pinpointing the exact row, column, and cell value. To see an even more comprehensive table of these errors, click on "Show details".
- Common Errors and Formalize Correction Steps
Most of the errors shown in the Validator are common. To fix these, you will need to return to the Formalize platform and locate the specific areas where the errors occur.
-
- LEI Check

- LEI Check
The LEI doesn’t exist, you find the supplier and correct the LEI number to an existing one.
-
- Not empty check

This indicates where there is a field that is missing information, depending on the report, you should go back to the relevant resource and fill in the missing field. - Format check

The format of the ID is not correct, you need to find the supplier with this ID and correct it according to the correct ID code type. - Constraint check

This check highlights inconsistencies in resource connections. For instance, an issue arises when a critical business function is linked to a resource that is classified as non-critical. To resolve this, you must consult the relevant report, locate the conflicting item, and thoroughly evaluate all connected resources and data to pinpoint the inconsistency.
- Not empty check
Correct the errors, export the report, and validate it again until you achieve 100%.
by Filipa Simões, Customer Enablement ManagerWe hope this article was helpful!
If you need additional support, you are welcome to reach out with any questions by email, at support@formalize.com.
